A record-number 111 million fans tuned in to Super Bowl XLV earlier this year, making it the most-watched television program of all time. The event is the ultimate clash of the titans—the best that the American Football Conference and the National Football Conference have to offer. Similarly, the game (with its astronomical Nielsen ratings) spawns a parallel competition that pits the best of Madison Avenue against one another in what has come to be known as “the Ad Bowl.”
Some viewers, in fact, contend that they tune in to the game just to watch the ads—a big win for advertisers in an age when more and more viewers have their finger on the fast-forward button while watching pre-recorded shows. During the Super Bowl, though, fans see the commercials more as entertainment and less as a sales pitch. That’s because Super Bowl commercials are famous for going all out in terms of their complexity; in contrast, some take a more subtle approach. Some use a serious tone; some focus on humor. Some capture our attention with cute animals; some with sexy women. No matter the tone, the expectation for a next-day watercooler discussion remains.
This year, audiences saw all these different calls from the Ad Bowl playbook. And a number of the more popular spots required a digital assist, some more than others—from the beautiful all-CG epic fantasy piece complete with a fire and ice dragon for Coke, to the comedy of the digitally altered Bud Light dogs that have a doggone time at a party, to the cute computer-generated Bridgestone beaver that shows us what Karma is all about, to a unique piece for Volkswagen featuring the CG “Black Betty” beetle, to a live-action/CG car heist that escalates from the daring to the downright ridiculous for Kia, to a cast of famous characters from TV past and present who subtly show their newfound postproduction-induced support for their favorite teams in a segment for the NFL.
These spots relied heavily on digital work to pull off the gag, and each did so successfully. Here, we take you behind the scenes as we unveil the digital magic.

| Framestore created the 60-second, all-CG commercial “Siege,” which contains a full range of digital imagery, from detailed structures and mountainous terrain, to digital characters, creatures, and crowds, to smoke, fire, and fireworks. |
Coke: Siege
Fire and ice don’t mix well. And that was certainly the case in the all-CG Coke “Siege” commercial, as two cultures—one fire, one ice—clash on an epic scale.
Set in a breathtaking, icy fantasy world, the 60-second cinematic story focuses on a battle between an army of fearsome fire warriors descending toward a peaceful community of ice-dwelling creatures. Accompanying the warriors is a huge fire-breathing dragon, which leaves a burning path of destruction in its wake and little doubt as to the likely outcome for the defenseless villagers—protected only by a tall, wooden wall surrounding their tranquil village. Suddenly, the city gates open and the villagers wheel out a sculpted ice dragon. With one blazing breath from the fire dragon, the ice sculpture melts to reveal a bottle of Coca-Cola, which is quickly consumed by the creature. The warrior general gestures for the dragon to attack the castle battlements, but instead of emitting a giant fireball, the dragon expels an explosion of harmless fireworks into the air. Confused and without their greatest weapon, the army beats a hasty retreat, leaving the villagers to celebrate their victory with bottles of Coke.
The commercial, produced by Nexus, contained an impressive expanse of CGI, from furry creatures, fleshy beings, and vast crowds, to the metal armor, fire, smoke, fireworks, ancient buildings and objects, towering snowy landscapes, rich forests, moody skies, and more. This expansive digital universe was built at Framestore.
According to Diarmid Harrison-Murray, Framestore VFX supervisor, the studio’s brief was far from simple: Create a painterly-style epic film, set within a fantasy world. “The directors were keen that it be filled with lots of detail and richness in terms of the environments and the characters,” he says. “Specifically, the visual brief was to create an animation that looked more like classic fantasy art than CG. That’s not a look you get for free in CG.”
Creating a Fantasy
Nexus, led by directors Fx & Mat, provided the initial concept art, which was then built out by Framestore. Some have compared the commercial’s visuals to those from the new
World of Warcraft trailer, others to the style of the movie
Kung Fu Panda. Yet, unlike those projects, this one has a softer style to the computer graphics, achieved through matte paintings (crafted by London-based Painting Practice), textures, and techniques used in the final composites whereby the artists painted out some of the crisp CG detail to achieve the spot’s fantasy-like aesthetic.
To create the different elements, the artists used a wide range of tools, including: Autodesk’s Maya for modeling, with sculpting and some texturing done in both Autodesk’s Mudbox and Pixologic’s ZBrush; Maya for previs; Adobe’s Photoshop for matte paintings; Side Effects’ Houdini for the main effects work (pyrotechnics, including fire, smoke, and fireworks) and far background environments (terrain and forest generation), along with Maya for the closer hero-character environments; Houdini’s Mantra and Maya’s Mental Ray (from Mental Images) for rendering; Framestore’s proprietary software for the fur creation and grooming; The Foundry’s Nuke for compositing; and Apple’s Final Cut for editing. Animation was completed using mostly keyframes in Maya, while facial animation was achieved using a blendshape approach with the expressions sculpted in Maya.
The animators augmented the character animation with motion capture performed at Framestore’s in-house studio with a Vicon system, and crowd simulation created from Framestore’s own particle-based system. “It wasn’t a complex avoidance system, but it did the job in terms of cleverly managing the data and making sure there was enough variation in the crowds,” Harrison-Murray explains. “It was created by a guy in our commercials division, and I am sure we will build on it and use it again in the future.” For this project, the crowd system handled a group of 1000 warriors in one scene and approximately 11,000 in another.
The most difficult character to create was the younger hero of the ice dwellers. “He required the most iterations,” says Harrison-Murray. “He was tricky; he had a cat-like look but couldn’t look too primate-like, and he had to have the appearance of a good, honest, hard-working guy.” Moreover, the character is covered in fur—about a half million hairs.
Another challenge was creating the fire. As Harrison-Murray explains, the directors wanted it to have the same dynamics and movement of real fire, albeit with a painterly aesthetic. Initially, the group produced the fire using a volumetric fluid renderer, but had to pull back on the rendering realism until the imagery blended well with the painterly world. “It’s hard to play with that many variables [in the sim] to get it to look the way we did in the renderer,” he notes.
The far background environments are mostly matte paintings. Sometimes they started as geometry and later were projected back onto the geometry in Nuke. The forest foregrounds, meanwhile, are CG, as are the burning trees. The city walls were built with geometry, with an overlay of matte at the end.
Not surprising, all the different elements within the scenes added up to quite a few layers. “It’s endless stuff,” says Harrison-Murray. “The fire and ice dragons. The matte behind for the sky and the mountains. A band of forest and trees. A wall of smoke. And then each of those elements had to be broken down into separate render layers. The snow had four, including diffuse and subsurface scattering, as did the trees. There were layers of CG crowds, and that was split into 10 different render passes. We had mid-ground, hand-animated surfaces for the Orc beast in the crowd. The hero Orcs came in with about eight or nine different comp layers. The ice dragon had lots and lots of different render layers, with glitter, specular, volumetric ice stuff. Plus, the foreground had interactive footprints where the armies had walked in the snow. Hero guys in the foreground…. I lost count.
There were many, many layers,” Harrison-Murray adds. “It was tough on comp. We were pulling a lot of CG and content from different software and trying to give it a unified feel.”
Group Effort
While the Framestore film and commercials divisions share tech, they each have separate pipelines due to the differences in the scale of the projects they encounter. “We need our tools to be lightweight and easily customizable,” says Harrison-Murray. For “Siege,” though, the commercials group borrowed from the film group; the most valuable commodity: people.
“They were quieter in film at the time, and we needed to ramp up quickly; we had to double our size, and we got some good guys to help us out,” Harrison-Murray notes. Some of that assistance came from Houdini artists, who helped build the procedural forests with techniques used for
Clash of the Titans. One of the major tech assets used from film R&D was the fur-grooming tool set, although the fur-rendering tools were not transferable since the film side uses Pixar’s RenderMan, while the commercials group uses Mental Ray for rendering out the hair.
Yet, the help, whenever offered, was greatly appreciated—especially given the condensed timeframe of the commercial. “We had three months from start to finish,” Harrison-Murray states. At the early stages, the project had a crew of a half-dozen, which ramped up to 60 at one point.
Whether it’s the commercials or film group, Framestore is best known for its photorealistic CG characters set within live-action back plates. And while the team may have been taken out of its element for “Siege,” the results are nonetheless stunning.


The canines in “Dog Sitter” required assistance from a trainer (top) and were filmed separately so the animals would not be distracted. The final scene (bottom) was a compilation of the various shots, including those with the human actors and the dogs, many of which required CG limb replacements.
|
Bud Light: Dog Sitter
When it comes to Super Bowl commercials, Anheuser-Busch’s Bud Light brand tends to get quite a bit of airtime, and this year was not any different. And when it came to creating the digital work, at least for this year’s game spots, The Mill, headquartered in London, seemed to be part of nearly every 30- or 60-second play. In all, the facility took on 19 commercials among its London, New York, and Los Angeles offices, including one of the top favorites, Bud Light’s “Dog Sitter.”
The premise of the spot is simple: A guy dog sits for a friend, who leaves him a refrigerator full of beer, along with several canines that “are really smart and will do whatever you tell them.” Lots of beer plus smart, obedient dogs equals party (at least in the sitter’s mind), during which the canines act as wait staff, pour drinks behind the bar, spin tunes like a DJ, and even “man” the barbecue grill.
No matter how smart the actors—in this case, the dogs—actually were, they needed digital assistance to pull off these human-like tricks. And that’s where The Mill New York came in. In the spot, the dogs stand and walk upright on their hind legs, performing tasks—such as holding trays, washing dishes, flipping burgers—with their front paws. So, most of the post work involved removing rigs from each scene and then adding in new arms and the objects with which they were interacting.
According to Tim Davies, VFX supervisor for the spot, for any profile dog shots, it was fairly easy to remove the rigs using a clean plate, as no part of the rig occluded the dog. But when the dogs walk toward the camera, two trainers holding a horizontal bar would stand either side of the dog. This rig, used to support the dog, would cover a large section of the animal’s upper torso and forearms, requiring extensive cleanup work.
Davies, also the lead (Autodesk) Flame artist on “Dog Sitter,” was on set during the filming, and after each take, he would acquire a plethora of high-resolution stills of the dogs’ fur and textures using a Canon EOS 5D Mark II camera. “I asked the trainers to stand the dogs upright so I could get a nice, clean shot of their torsos without them being covered by the rigs,” he adds. Those stills were then tracked over the rigs, so the rigs could be removed.

| This doggie DJ scene was among those with the highest number of layers. The canine in the foreground alone required substantial work: The dog had to stand on its hind legs and bob its head to the music, while its paw (with a digital assist) scrubbed the record back and forth. |
Helping Hands
Yet, this was not simply an easy job of roto’ing and comp’ing. “In a lot of the shots, we completely removed their arms as well and put new arms in, and added all the [serving] trays,” says Davies.
For instance, at the beginning of the party sequence, a large dog answers the door while holding a tray of beers. “That dog needed a big rig with a three-inch bar, and two trainers to hold it up,” notes Davies. “We found that when the dogs are standing upright on their back legs, they are breathing quite heavily. So you can’t just track a still onto them. You have to animate the expansion and contraction of the actual still you are placing on top to simulate the breathing. Then you have to re-introduce the shadows and seamlessly blend the fur.”
As the dogs walked, supported by the rigs, they often looked like they were leaning forward in a rigid position, which was corrected in Flame. Nearly all the dogs had to be rotoscoped from the scene anyway, because they had to be placed in front of or behind other objects or dogs in the scenes. “With the use of this roto, we were able to adjust the posture of the dogs by bending them at the waist, making them appear more upright,” says Davies. There were also instances whereby the team added a gentle sway to the dog’s upper body so it wouldn’t looked as though the dog was leaning on something fixed.
“Every single dog required a separate take,” says Davies, noting that some of the animals did not work well in the same space as the other talent, whether human or canine. In the end, nearly every scene was made up of more than 10 passes. “That was key to the success, having each dog shot as a separate layer. We were able to choose the best of each dog’s takes, and every dog’s performance could be retimed for the best reaction.” Davies offers the example of the bloodhound at the bar: “We had over 50 seconds of the dog looking up and down, which allowed us to slip the timing of this layer independently of the scene. This enabled the dog to look up at the girl and then back down at his beer glass while pouring, in perfect unison with the girl’s actions.”
In addition to the rig removal and comp’ing, The Mill often had to replace and animate limbs for shots in which the dog’s arm was holding onto something—for instance, the doorknob, the beer tap, or any of the beer trays. However, most of this was achieved by animating still photography. “I think the biggest success of the spot was that we decided to go with an in-camera approach,” says Davies. “In the early stages of the project, there was talk about doing fully CG dogs. But that’s tough and time-consuming; they tend to end up looking like CG dogs. It’s not just the way they look, but more the way they move—they can look like animated cartoons.”
Nevertheless, there were some instances when CG was unavoidable. For one, in which the dog is washing dishes, Davies says the crew was unable to pull off the shot in 2D because the motion and perspective needed was very complex, so the CG team created models of the dogs’ arms and upper body, and then supplied photoreal animated elements of these difficult tasks.
“The idea we were going for was that if these dogs are clever and well trained, maybe they could pull off these stunts,” Davies explains. “We wanted to leave the question, Could these dogs really do that?”
Therefore, the motions were underplayed and restricted. And, whenever possible, real objects on poles and wires were shot for the interaction, as was the case when the dog is drying a glass with a towel. “We got some of the way there,” Davies says. But not all the way: The team ended up incorporating a CG mug and dog limbs to complete the contact.
The Mill used Autodesk’s Maya for the CG work in that shot, as well as for the dog flipping burgers on the grill. “We originally had the dog flipping the burger over, which twisted the dog’s wrist around. It just felt like we pushed it into the unbelievable, so we ended up re-animating it at the last minute to simplify the movement to something more believable,” explains Davies.
While some of the dog arms were re-created in CG, the trays and other objects were added in the Flame. “We were able to project the trays and bottle onto cards that were animated in 3D space, allowing proper perspective and parallax,” notes Davies.
In all, the production company spent approximately three days on the shoot—and Davies notes that they were extremely patient since nearly every plate had to be set up for VFX. “We shot trays, we measured the dogs’ height as they walked through the scene, and then built trays to match and wheeled them through the scene for the right focal and lighting references,” he says. “We had all these elements, and it was plate after plate.” The saving grace: the decision to go with a locked-off camera, which eliminated the need for motion control and camera tracking.
While all the dogs were shot on set, a few of the more scruffy pooches had a greenscreen placed behind them to ease the roto work, made even more complicated by all the hair.
In addition to Flame, the team used Autodesk’s Smoke and Flare for the compositing, Combustion for the roto work, and Maya for the CG. Color grading was also handled by The Mill using FilmLight’s Baselight.
In addition to “Dog Sitter,” Davies worked on two other humorous Bud Light spots for the big game: “Product Placement” and “Severance Package.” But, it was “Dog Sitter” that tied for the top spot in the
USA Today Super Bowl Ad Meter ranking.


| An animal actor named Waldo (top, at right) starred in some scenes and served as a photo reference for the realistic CG model (top, at left), which was created at Method using Maya, ZBrush, and Houdini. (Bottom) Scanline used its Flowline software to create the water sim near the end of the spot. |
Bridgestone: Carma
Animals are usually a sure crowd-pleaser when it comes to commercials, and indeed, a beaver that repays a motorist’s act of kindness was well received during the Super Bowl break.
The spot, which was driven by the same crew that brought us “Scream” (featuring a CG squirrel) during Super Bowl XLII in 2008, opens as a beaver lugging a tree branch attempts to cross the road. In an ode to that previous piece, the panicked animal, too frightened to move, braces for impact with its paws outstretched and mouth agape. Seeing the helpless beaver, the man quickly swerves his car to avoid hitting it. The animal salutes him in a sign of gratitude. Six months later, we return to the same location, this time during a rainstorm, as the driver stops the car just in the nick of time, as a huge tree falls across the road. As the shaken driver gets out of his car, he sees that the bridge, visible in the original scene, has been washed away by the now-raging river. As relief sweeps over him, he sees the grateful beaver standing beside a newly chewed tree stump. This time, the rodent gives the man a chest bump.
“It was the same group—agency, director, creator—from the ‘Scream’ spot three years ago, so we all knew one another,” says Andy Boyd, VFX supervisor/lead 3D artist at Method Studios, which handled the post work for both productions. “The expectations, though, were high since ‘Scream’ had looked so good. But for this, we were starting from the endpoint of all that other hard work. The good thing, though, is that technology has moved on, so what was really hard then is not as hard anymore in regard to the number of hairs on an animal, for instance. Before, when I went over 1gb of memory, my computer would crash. Now I use 24gb, and it never crashes.”
Leave It to Beaver
Obviously, the majority of the work on “Carma” involved a computer-generated beaver. In fact, there were seven to eight versions of the 3D animal used in the 30-second spot, from the full hero beavers, to the half CG/half live-action animal used for the chest bump. There was even a real animal actor.
“The model looked fantastic, but we got lucky on set with the director [Kinka Usher], who spent a good amount of time trying to get the animal [to do what was needed], and that was a huge help,” says Boyd. “In the two end shots, the real beaver almost did exactly what we wanted him to do—obviously not the chest bump, but pretty damn close. So even though we had the CG version, it is always good to use the real stuff as much as possible.”
The digital model was built by Method’s team using Autodesk’s Maya and Pixologic’s ZBrush, with rigging and animation done in Maya. The fur generation and rendering, however, was accomplished within Side Effects’ Houdini.
According to Boyd, the crew carried over a lot of technology from “Scream,” and adapted it to the beaver. “On ‘Scream,’ it was the first time I did close-up fur stuff, the first time I had set up a fur system, so a lot of what I was doing on the screen was prototyping,” he says. “I now had that technology experience behind me, so the work was more standard.”
By applying lessons learned, the team was able to generate a CG beaver with five million-plus hairs, 4000 of which are guide hairs. In comparison, the CG squirrel contained closer to one million hairs in its pelt. “That would have been a really big deal on the squirrel. [The model] would have drown in memory if we had that many back then,” Boyd notes. Not so this time around, especially with a 64-bit operating system. “With the faster computers, you can add the proper number of hairs until it looks right, and you don’t have to worry about the number, as long as you stay under five million,” he adds.
Grooming, to achieve the desired clumping and texturing, was performed in Houdini and rendered with Mantra. This was done using two different approaches: Boyd groomed the beaver used in the sunny shots, while Brian Burke groomed the wet animal for the rainy shots. “It took on a totally different look and shape; it’s a completely different groom. It could have been a completely different animal,” says Boyd of the wet version. Despite the difference in styling, the model and rig were identical.
While the rig was not overly complicated, the artists did add a more complex muscle system with built-in dynamics, as they had done for the squirrel. “As it turns out, the real beaver gave a fine performance, but if they would have needed our model to do some more complicated movement, like walking across the road, we would have been ready,” explains Boyd.
In the first two shots, a trained beaver named Waldo performed, carrying the tree branch. “He’s as trained as a beaver can possibly be,” says Boyd, noting that the group filmed the animal on set for reference. Waldo also stood up on his hindquarters, perfect for the chest bump shot, “but only if you waived food in front of his face,” Boyd adds with a chuckle. For the chest bump, the artists used a CG arm and chest, which was composited into the live action; the artists also adjusted the head position and the eye line slightly for the completed shot. The remaining shots contained the all-CG model, while an animatronic was used for shot reference.
According to Boyd, the most challenging part of the project was the salute. “It falls into that weird ground of trying to get a creature to do something that it can’t really do,” he says. “[The work] can go into that uncomfortable place where [the model] looks real in the frame but it is doing something that you know it can’t do.” With this in mind, the team chose a subtle motion for the salute that was noticeable by viewers but didn’t tread too far into that unreal zone.
The Pixel Farm’s PFTrack was used for camera tracking. Matchmoving the beaver was done in Maya.
In addition to the beaver, the commercial also contains CG river shots amid the live action. Burke modeled the digital bridge and riverbed using Maya, while Scanline, a VFX company in Germany that specializes in fluid effects, generated the fast-moving river. “When we got the storyboards and saw the raging-river shots, we wanted the work to be the best, and Scanline does incredible water work,” says Boyd. Scanline used its proprietary Flowline software to create the simulation, and Method’s Jake Montgomery pre-comp’d it with the CG bridge and additional CG debris using The Foundry’s Nuke. He then added atmospherics and finished the composite in Autodesk’s Flame.
Aside from the simulation assist, the work was handled by three CG artists and one compositor at Method. “It was one of the best jobs I have done in terms of just being in a small team and having a lot of fun,” says Boyd. “Everyone really enjoyed themselves, and we were lucky enough to have been given the time to explore ideas to best tell this story.”
Volkswagen: Black Beetle
Every so often a commercial uses a catchy tune that stays with you for quite some time. Such was the case for Volkswagen’s “Black Beetle.”
The commercial features a fully animated CG beetle (insect) that maneuvers its way around the various obstacles and terrain it encounters, doing so in an automotive style and to the beat of Ram Jam’s “Black Betty.” The spot is fun, engaging, and creative in both concept and design. “It’s an action-packed car chase in the forest,” says The Mill’s Tom Bussell, who, along with Juan Brockhaus, served as lead 3D artists on the project.
Bussell and Brockhaus guided the spot from beginning to end—from storyboards, to supervising the live-action shoot, to final delivery—all of which spanned just six weeks. “When a project is predominantly based around animation, the clients have to take a huge leap of faith and trust us creatively as well as technically,” says Bussell. “The reality of such a quick turnaround and so much CGI is that it only comes together in the final few days of the deadline.”
The scene opens in a lush, wooded environment, as some black bugs meander along the ground—when suddenly a black beetle overtakes them, speeding along over the rocks and dirt, quickening its pace across a moss-covered branch spanning a creek. The bug rounds a corner, nearly careening into a centipede before catching air, and then buzzes past two praying mantis, cuts through fire ants on the march, again flies through the air above a field of grass and dandelion seed heads, before landing sideways on a rock. The screen grows dark as a white line assumes the shape of the black beetle—and the new Volkswagen Beetle.
In contrast to the CG characters in the spot—the mantis, ants, dragonfly, centipede, caterpillar, and so forth—the environments are mostly live action, filmed in a studio. “This was no miniature, though. Christopher Glass and his team re-created a huge section of organic forest inside the studio in Hollywood that must have been 10x10 meters,” describes Bussell. “Being on set felt like you were standing in a dense forest. They did a great job.”

| The Mill created the fun, lively spot for Volkswagen featuring computer-generated insects, including the main character: the black beetle. |
Beetle Mania
As for the insects, The Mill created eight main bugs, and in the case of the mantis and ants, tweaked the subsequently replicated models for variation. All the base models were generated using Autodesk’s Softimage and then refined using the sculpting tools in Pixologic’s ZBrush.
The biggest challenge, though, was getting the design of the hero beetle nailed down. “For all the other insects, we matched to how nature intended them to look. That was the easy part,” says Bussell. “But in a car commercial with no actual car, there was a big design element to the hero beetle; we had to convey the right message about the car. We needed our beetle to subtly reference the new design without the insect feeling too ‘engineered.’ If you look closely, you can make out subtle shapes in the shell that act as wheel arches, the eyes are headlamps, and the silhouette from the profile is very similar to the new car design.”
Despite the commercial centering on the design, the look was not finalized until late in the project. “We needed to see the whole animation together before knowing how far to push the design of the beetle,” adds Bussell. Making that task somewhat easier was the robust geometry-caching pipeline the crew used, which gave them the ability to change things up late into the project with little fuss for the animators, rendering group, or lighters, and enabled them to spend more time on the creative aspects of the 3D.
Before the model was approved, the rigging team, led by Luis San Juan, began building a stable pipeline that would automate the rigs to the numerous legs of these insects. The centipede rig was designed so that once the animator started working on the body, the legs would subsequently move in the anatomically correct way. Nevertheless, the animators could override this movement with timed keyframes.
“Although our brief was to create an insect that behaves like a car, we felt it was important to stay anatomically correct in order for the animation to be believable,” explains Bussell. To this end, the artists studied various BBC documentaries of insects, gathered slow-
motion footage, and built the digital insects with this action in mind.
“I know way too much about insects now!” says Bussell with a laugh.
In a complete 180 turn, though, the group also studied iconic car-chase scenes, with the reference ranging from
Starsky and Hutch and
The Fast and the Furious, to non-chase reference such as
The Matrix bullet-time effect. “Each shot in the commercial, from the framing of the shot to the animation of the beetle, is based around similar concepts to those iconic film moments,” notes Bussell.
While design and animation took some time to develop, the music track was set from day one, which was a tremendous help, says Bussell, because it meant that the editor had a track to cut to, and the artists had something to base their animation on. “This helped with the buildup to the end crescendo in which the beetle jumps off the log and flies through the air ‘
Starsky and Hutch style,’ landing on the rock and skidding to a halt,” he adds.
Insects in Detail
Although the artists found a plethora of useful textures online, they took things a step further, contacting an expert at the Natural History Museum, who helped the team find the specific insects they were looking for. They then took high-res photos of the bugs and, using Adobe’s Photoshop, applied those surfaces, along with some hand-painted textures, onto the CG models. “The trick was to just keep adding more and more detail,” says Bussell. “Once the base model was created and the UVs unwrapped, we started applying the high-res textures.” A final level of detail (pores and imperfections) was then added in ZBrush.
The insects were rendered in Softimage and Mental Images’ Mental Ray. A Spheron camera was used on set to capture HDRIs from both a chrome (for reflections and high spots) and gray ball (for shading and color temperature) at the same angle and with the same camera. Also for every shot, the crew photographed plastic insect models on set. “We got funny looks from the crew, but it was a useful lighting guide,” Bussell points out.
In addition to the beetle, the group focused on the animation occurring around the main insect. All these collective movements were achieved in Autodesk’s Maya by a small team led by Johannes Richter, which added particle atmosphere to all the shots—from the pollen to the small flying insects—to help bring the shots to life. According to Bussell, the dust trails and debris elements provided the biggest challenge here, with the group using references of various elements—from radio-controlled cars skidding through dusty terrain, to a car driving through the desert. It all boiled down, though, to artistic license, since a bug the size of the CG beetle wouldn’t ever kick up as much dust as it did in the spot.
“That aside, we felt it was an important final touch that referenced back to the idea that this was a car chase,” explains Bissell.
All these elements were then composited into the final shots using Autodesk’s Flame and The Foundry’s Nuke. The comp team also used Nuke to enhance the undergrowth and vegetation of the live-action backgrounds. The environment in one of the final shots, in which the beetle is flying through the air, was put together entirely in Nuke using still photos from the set.
So, what made this project so successful? Bissell says it boils down to a good idea from the very start. “I had the luxury of working on some of the really great iconic work in advertising over the years, and this one is right up there,” he says. “Every artist at The Mill wanted to work on it. It’s just one of those projects that has all the right ingredients from the start.”
Kia Optima: One Epic Ride
In contrast to the Volkswagen commercial, in Kia Optima’s “One Epic Ride,” the focus is on the vehicle throughout this wide-ranging adventure—which takes the audience from land, to sea, to a distant planet, and beyond.
The action starts off with all the suspense of a
James Bond film, as a police officer impersonator makes off with a couple’s Optima, leaving them handcuffed to his parked motorcycle. As the person drives along a coastal highway, a villain in a helicopter fires a high-tech magnet, lifts the car, and carries it out to sea to an awaiting yacht, where a handsome fellow surrounded by beautiful women eagerly awaits its arrival. Suddenly, in a nod to fantasy, Poseidon emerges from the water and grabs the vehicle—but only momentarily, as a green light from a hovering spaceship beams the car aboard. The scene cuts to a sparse, dusty landscape, where an alien takes the wheel. A time-warp portal opens, and the Optima is sucked through to the other side, where a Mayan chief receives this bounty from atop a pyramid, as tens of thousands of warriors cheer in appreciation of their new gift.
Sound a bit over the top? That’s the intention, says executive producer Melanie Wickham from Animal Logic. “The purpose was for everyone to go to extraordinary lengths to get this car, with the antics getting more ridiculous as [the spot] moves along,” she says.
While the assets for the 60-second commercial were built at Animal Logic’s Sydney headquarters, the live action was shot in California at various locales, including a soundstage, with some members of the Australia team attending those shoots. Because of the short production schedule for the spot, accurate previsualization (created in Autodesk’s Maya) was especially crucial to the spot’s overall success, notes Matt Gidney, CG supervisor. Detailed concept work was equally important, as it gave the director, agency, and client a clear understanding of this design-intensive, multi-sequence, multi-location spot.
“Concept work is used to pitch something beautiful, but for us, it was important to establishing direction as quickly as possible,” says Gidney.
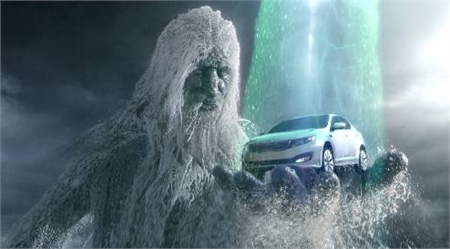
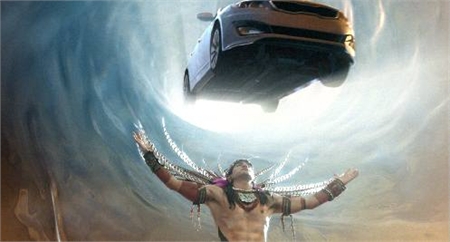
| A mix of in-camera and digital elements fuels the unique “Epic Ride” spot. Animal Logic used its own water modules to create the all-CG Poseidon at top, while a range of off-the-shelf tools, including Maya, were used to create the digital elements for the bottom scene, which also includes a live actor. |
Extreme Elements
The spot incorporates many different sets and infuses many different genres, each with its own distinctive look. All the backgrounds began with live-action plates, though a good portion of the objects needed to support the story line were built in CG. Even the alien landscape is practical, shot near the Mojave Desert, albeit with digital moons augmenting the landscape; a 3D alien completes the scene. In addition to the practical backdrops, the commercial incorporates matte paintings and digital set extensions.
“We were faking quite a lot. Every shot was touched in some way,” says Andy Brown, VFX supervisor.
The most obvious computer-generated elements (by way of the action) are the helicopter, boat, and, of course, Poseidon. Mostly the star of the spot—the car—is practical, though at times, it, too, had to be built digitally.
Maya was used to create and animate the models; texturing was done in Maya and Adobe’s Photoshop, with some experimentation conducted in The Foundry’s Mari. Meanwhile, The Foundry’s Nuke and Autodesk’s Flame were employed for compositing. For tracking, the group used 2d3’s Boujou. Rendering was done in Pixar’s RenderMan and Animal Logic’s MayaMan, the studio’s Maya-to-RenderMan software.
One scene that especially challenged the artists, and for which they are most proud, is that with the all-CG, water-simulated Poseidon.
During the past few years, Animal Logic has been developing ALF, its 3D software framework, and when it came time to “tie up some lose ends with the water module,” Gidney had sat down with the studio’s R&D team to determine the best solution to incorporate into the framework. After a test period during which time the developers examined Side Effects’ Houdini, Next Limit’s RealFlow, and in-house solutions, Animal Logic committed to extending the functionality of the proprietary water modules for the ALF Nexus tool set.
“We decided that we could get more done within our own framework, because once the coding was done, we could iterate on the solutions quickly, saving expensive resource calculations,” explains Gidney. “We just have to code a particular solution once. As a result, we were able to do some very large simulations distributed across the farm, producing vast amounts of data describing water, which we then could pass back into RenderMan.” With this setup, explains Wickham, the team only has to write hooks into other software, such as Houdini, Maya, and Autodesk’s Softimage, saving a great deal of time otherwise spent doing complex coding.
That decision paid off when it came time to simulate the water for the Poseidon sequence. “We were able to get those sims out very quickly,” says Wickham, noting that the studio shares the framework across its film and commercials divisions. In fact, the water module was used extensively in the animated feature
Legend of the Guardians: The Owls of Ga’Hoole.
Animal Logic’s teams in both Los Angeles and Sydney worked together on “Epic Ride.” According to Brown, all the previs and shoot prep was done in LA, and the spot was posted in Sydney. As Wickham points out, “The agency was a little nervous sending [the work] down to Sydney, but with our review tools, it’s now easy to work remotely.” And that’s a concept the crew proved true in epic style.
NFL: Best Fans Ever
Perennial advertising giants Budweiser and Coke are not the only brands known for creative Super Bowl commercials. In fact, the NFL has been coming up with smart plays of its own in recent years, including 2011’s “Best Fans Ever,” featuring digitally altered clips from a range of favorite television shows past and present in which the characters are re-dressed in team gear and football-centric elements are inserted into the scenes.
“We were tasked to create a story for the Super Bowl built around the experience that everyone shares,” recalls editor Ryan McKenna from The Mill. The group settled on the concept of “preparation,” focusing on the anticipation and excitement of the big game.
A large crew from The Mill’s New York office spent weeks sifting through mounds of television footage—from iconic series such as
Seinfeld, Cheers, 90201, The Brady Bunch, and the
Sopranos, as well as
Glee, The Family Guy, and more—looking for certain moments that had potential. That is, potential for the clip to be re-created into a fan moment. Those clips were then placed into categories describing the scene—for instance, stars delivering one-liners, making entrances, eating food, and so on.
“The list of shows didn’t really shrink much from what we started with,” says McKenna. “There were very few ‘Nos.’ ” Having actor Henry Winkler and actor/director Ron Howard sign off “from day one, minute one,” on their
Happy Days clips didn’t hurt the NFL’s cause, either. Other talent soon followed, though some with caveats. New Yorker Jerry Seinfeld would only agree if he was portrayed as a Giants fan, “which is what we wanted him to be anyway,” says Ben Smith, creative director at The Mill-NY.
Real Fans
The fictional location of the shows dictated which team those characters would root for:
Cheers’ Norm is dressed in a Patriots jersey; the
Sopranos crew is decked out in Jets gear;
The Dukes of Hazzard ’s General Lee sports a Falcon’s logo. The group decided early on, though, that the characters, who span nearly 40 years of television, would wear modern styles rather than those more appropriate for their period. According to Smith, this made the gags more obvious to the audience, despite the fact that the change was otherwise seamlessly integrated into the various shots.
Typically, the agency would first secure rights to the imagery, and after the edit was finalized and locked, the post team would then begin its work revising the clips. However, when the client handed The Mill this project, the group was already facing a late-running clock. So, The Mill crew had little choice but to begin post work on some of the clips that had been approved by the network, with the hope that the talent would sign off as well; if the rights were not granted, then the work was abandoned for another clip that fit into the edit.
“For this project, the edit didn’t get locked for about six weeks,” McKenna notes. As a result, there were times when the team would get about 90 percent finished with the effects, and a shot would change, requiring new editorial, and with it, new effects.


| The Mill team re-dressed actors and sets from approximately 40 iconic TV shows in NFL gear for an NFL ad. The project required a tremendous amount of camera tracking, rotoscoping, and compositing, though each clip required a unique approach. |
One Shot at a Time
In the end, the commercial contains approximately 40 altered clips, though the digital crew worked on far more than that, for some reason or another, didn’t make it into the final spot. How the team approached each clip, however, varied. “No two shots were the same,” says Smith. Some shots contained 2D elements filmed at The Mill using the studio’s lighting and greenscreen setup, and then composited into the clip; others incorporated CG elements. This mixed approach required the team to simply take a brute-force approach—whatever the problems were in the shot, the artists had to deal with them in whatever method worked best for that clip. Sometimes the artists tried different solutions until one stuck.
“A lot of the camera work contained nodal pans and tilts, so there wasn’t much 3D camera tracking to do,” says Smith. “That made tracking and comp’ing much easier.” Often, the group had to take out the camera move, clean up the frame, composite the new imagery, and then add the camera move back ion.
Then there were trickier shots that required CG, as with the
Seinfeld clip of Jerry and Newman. “Even though the camera is just a pan, because their bodies are moving so much, we couldn’t get away with a 2D approach. It had to be a 3D solution,” explains Smith. “That involved tracking the camera, roto-animating both characters, and then building the jersey, hat, and jacket, and then lighting, rendering, and compositing as we normally would do. That’s a long process.” And just for a few seconds of a clip. Times 40 clips.
“What we learned on one shot couldn’t be applied to another because it contained a whole other set of problems,” says McKenna. “That’s unusual for VFX shots, where it’s usually one setup that is propagated through all the shots.”
The work also entailed a great deal of cloth simulation, since most of the revisions involved clothing. “It was a challenge because we were dealing with a moving camera and a moving person,” notes Smith. “Compositing 3D cloth next to live-action limbs, where a live-action hand meets a CG cuff—it had to track absolutely perfectly or there would be slipping.”
For the cloth sim, the artists used Autodesk Maya’s nCloth. They also employed Apple’s Final Cut, as well as a mishmash of Autodesk’s Maya, Mudbox, Softimage, and Flame; Science.D.Vision’s 3DEqualizer; The Pixel Farm’s PFTrack; The Foundry’s Nuke; Adobe’s After Effects; and FilmLight’s Baselight for color grading.
According to Smith, the most difficult footage to work with was from
90210 because the quality was so poor. But then again, nearly every plate the group dealt with was a different format and quality. To make matters worse, for most of the shows the group had to work from DVDs as opposed to higher-quality tapes due to the time crunch.
Even though the path taken to get the final results took many twists and turns, in the end, The Mill’s work on “Best Fans Ever” generated a large number of fans as well—from audiences as well as the talent used in the clips. “I was sure we would end up with four shows [that would sign on]. The project just seemed too ambitious for the timeframe,” says McKenna. “But this just goes to show the power of the NFL.
People love it.”
Click here to view video clips of the commercials discussed here.
Karen Moltenbrey is chief editor of Computer Graphics World.